Solution
Jump to a topic: Apply finance charges to multiple accountsYou can apply finance charges to accounts with or without payment agreements. You can apply finance charges to all or part of your patients automatically, allowing Dentrix to calculate the charges, or you can enter the finance charges manually for individual patients at any time. The finance charge option is used to calculate and create finance charge entries for accounts automatically.
You can apply finance charges on a monthly basis. Although you have the ability to apply the finance charges at any time during the month, we recommend it is done at the end of the month. If you choose to apply finance charges at a different time, apply them consistently and at about the same time each month.
1. Back up your Dentrix database.
2. Launch the Reports and Tasks Scheduler.
*For a detailed explanation of the Scheduler, as well as a list of available reports and tasks, please see article 86271.
- In the Ledger menu, click Task Scheduler (Month End).
- Or in the Office Manager menu, click Maintenance, and then click Task Scheduler (Month End).
The Reports and Tasks Scheduler dialog box appears.
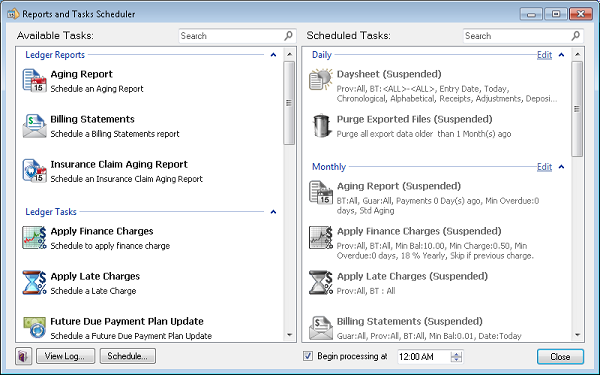
3. In the Available Tasks list, double-click Apply Finance Charges.
The Task dialog box appears.
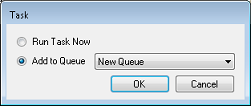
4. Select the appropriate option:
- Run Task Now (default).
- Add to Queue and select a queue from the list.
The Apply Finance Charges dialog box appears.
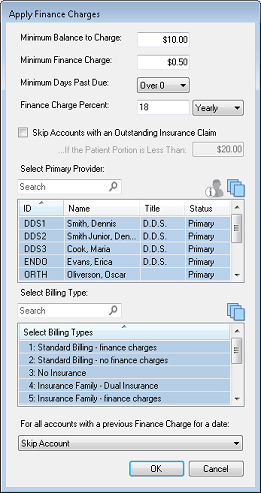
5. Adjust one or more of the following options:
6. Click OK.
If you selected Run Task Now, finance charges are calculated immediately. If you selected Add to Queue, the report or task is added to the Scheduled Tasks list.
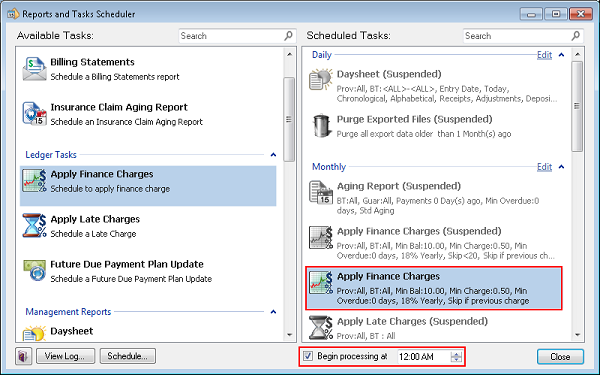
7. In Begin processing at, set the time you want the report or task to process (default is midnight). The report or task processes automatically at the time you set and according to the queue you placed it in.
8. In the Scheduled Tasks list, click Edit to the right of the queue name.
The Edit Queue dialog box appears.
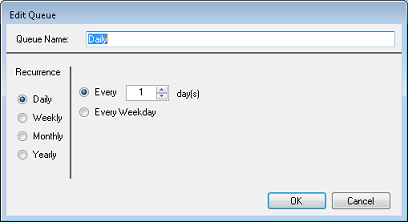
9. Complete one or more of the following tasks, and then click OK:
- Queue Name - If you are creating a new queue, type a unique in the text box.
- Recurrence - Select one of the following options:
- Daily - Sets the queue as a daily task. Select Every and then set the number of days you want the task to recur, or select Every Weekday (recurs every business day).
- Weekly - Sets the queue as a weekly task. Set the number of weeks (1 for every week, 2 for every two weeks, and so on, and then select the day of the week you want the task to run.
- Monthly - Sets the queue as a monthly task. Select Day, and then set the day of the month and how often the task recurs. For example, Day 1 of every 1 month(s) means the task recurs on the first day of every month. Or, select the second option to set the task to recur on the first, second, third, or fourth selected day of the week every month. For example, to run a task on the second Tuesday of every month, you would select: Second, Tuesday, and the number 1 (every two months 2, every three months 3, and so on).
- Yearly - Sets the queue as a yearly task. You can set to a date of a selected month or as the second Tuesday of March.
Back to top
In addition to applying finance charges at
month end, you can also apply finance charges for individual accounts manually.
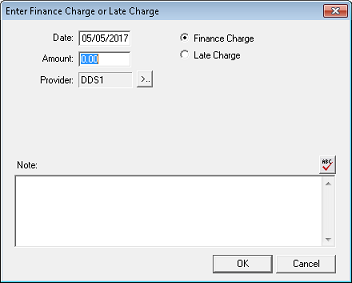
1. In the Ledger's Transaction menu, click Enter Finance Charge
or Late Charge.
The Enter Finance Charge
or Late Charge dialog box appears.
2. Do the
following:
- Amount - Type the amount of the finance charge.
- Type - Select Finance Charge.
- Provider - Click the search button and then select the patient’s provider. (By default, Dentrix selects the patient's primary provider.)
3. Type a note.
4. Click OK to save any changes and apply the finance charge.
Back to top
1. With a patient selected in the Ledger, double-click the finance charge.
The Change or Delete Finance/Late Charge dialog box appears.
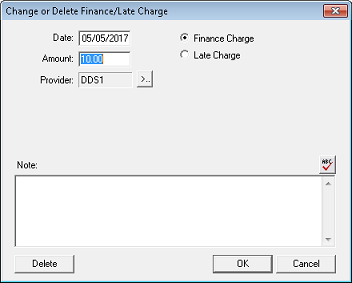
2. If necessary,
type a brief note on the Note text
box.
3. Click Delete.
Back to top
1. Open Office Manager, click on Maintenance and choose Delete Finance Charges.
The Delete Finance Charges dialog box appears.

3. Choose the Finance Charge Date to remove charges from.
4. Click OK
Back to top
|

